Dr. George Rivera
Although impressions provide the foundation for creating highly esthetic and functional restorations, capturing the complete and precise details of the hard and soft tissues surrounding the affect tooth or teeth can sometimes be challenging. As a blueprint for restorative treatments, taking accurate impressions requires the ideal combination of technique and materials to create a durable, physical replica of the patient’s intraoral condition. Many techniques require extensive steps and can be time consuming to learn and perform.
Additionally, shortcomings inherent to the impression techniques and materials themselves can also complicate the impression taking process. Voids and bubbles introduced into the impression material during application can decrease accuracy and durability. Runny materials can increase patient discomfort and inhibit a dental professional from achieving the desired accuracy. Weak impression materials and those that demonstrate poor dimensional stability can contribute to problems when pouring molds or in the laboratory during the fabrication process, ultimately leading to the worst-case scenarios of retaking impressions and/or remaking restorations.
To overcome these challenges, dental product manufacturers have developed and introduced alternative impression materials and techniques that demonstrate user-friendly and predictable characteristics. As a result, it is now easier for dental teams to effectively capture the details of the preparation and surrounding dentition. In particular, enhanced wash and putty materials demonstrate increased tear strength and durability, ensuring greater stability and repeated impression use.
Virtual® XD Impression Materials
Developed to provide an alternative solution for the many complications associated with traditional impression materials, Virtual® XD from Ivoclar Vivadent (Amherst, NY) is formulated for accuracy, precision, easy handling, and convenient working times. Demonstrating improved thermo-sensitivity and dimensional stability, once the impression tray is seated in the patient’s mouth, the Virtual® XD setting reaction accelerates immediately, saving valuable chair time and reducing the risk of deformation caused by impression try movement during seating. The improved dimensional stability allows Virtual® XD impressions to be viable for up to two weeks, giving dental teams the ability to pour several models from one impression, with easily disinfection.
This advanced line of vinyl polysiloxane (VPS) impression materials exhibits optimized flow, advanced wetting ability, and high tear strength. Optimized flow ensures that the impression material exhibits an ideal viscosity, one that doesn’t run or slump off of the tray. This allows for deeper penetration and improved preparation coverage. Additionally, the wash materials displace oral fluids deep in the sulcus, capturing the fine details of margins and all prepared surfaces. With their advanced wetting ability, Virtual® XD materials demonstrate very low contact angles, which allows them to precisely reproduce soft and hard tissue details. This characteristic also enhances the ability of the wash materials to spread easily across the preparation surfaces to create precise impressions. Easy to remove due to excellent tear resistance and outstanding elongations, Virtual® XD materials also reduce the risk of tearing fine margins. Upon removal from the mouth, Virtual® XD impressions demonstrate high tear strength to maintain the integrity of preparation margins and fine details. Heavy and light body Virtual® XD materials are indicated for many impressions, including those for crowns, bridges, inlays, onlays, veneers, implants, and edentulous patients. In addition, the materials can be used with all impression techniques.
Case Presentation
A 56- year old female presented with a fracture on central incisor tooth #9 due to trauma (Figure 1). The tooth was assessed and determined to be vital, with an intact root. After thorough examination, an indirect veneer was agreed upon as the most appropriate and ideal treatment for restoring esthetics and function. Therefore, an impression captured using a dual phase technique in order to obtain an accurate representation of the preparation and occlusion would be needed.
Dual Phase Impression Technique
- A lip and cheek retractor (OptraGate®, Ivoclar Vivadent, Amherst, NY) was placed in the patient’s mouth to isolate the oral cavity.
- A retraction cord (GingiBRAID+ #2, Dux Dental, Oxnard, CA) was then placed to isolate tooth #9 prior to treatment (Figure 2).
- Tooth #9 was prepared for a veneer restoration (Figure 3).
- The appropriately sized impression tray was selected, tried in the patient’s mouth and the fit evaluated.
- Tray adhesive was applied to all areas of the tray that would come into contact with the Virtual® XD impression material.
- The two-cartridge dispenser was loaded with Virtual® XD light body wash material and tray material, and then bled to verify an even flow of base and catalyst before applying the mixing tip.
- The Virtual® XD light body fast set wash material was placed around the preparation (Figure 4), after which the Virtual® XD heavy body fast set tray material was loaded into the impression tray. The intramural syringe tip was buried into the material to avoid voids, air, and bubbles.
- The impression tray was inserted into the patient’s mouth and held in place for 2 ½ minutes to set (Figure 5).
- Prior to removal, the material was checked to verify it set, and then removed.
- The impression was then rinsed, dried and disinfected (Figure 6).
After the impression was completed with the Virtual® XD materials and forwarded to the laboratory, the veneer was fabricated from a leucite reinforced glass ceramic (IPS Empress HT, Ivoclar Vivadent, Amherst, NY). At the cementation appointment, a light curing, fluoride releasing, single-component total-etch adhesive (ExciTE F, Ivoclar Vivadent) was applied to the surface of the preparation (Figure 7) and cured. Then, a light-curing luting composite (Variolink Veneer, Ivoclar Vivadent) was applied to the veneer, after which it was seated, light cured (Bluephase, Ivoclar Vivadent, Amherst, NY) (Figure 8), and finalized (Figure 9).
Conclusion
Dental impressions serve as the blueprint for final restorations, and using a simple technique and predictable impression materials can improve the predictably and accuracy of the impression taking process. The Virtual® XD impression materials, when used with a dual phase impression technique, produce a precise representation of a patient’s preparation, soft tissue architecture, and surrounding dentition. In this case, it allowed the dentist and laboratory to provide the patient with a long-lasting, well fitting, and highly esthetic final veneer restoration.

FIGURE 1: A 56- year-old female presented with a fracture on central incisor tooth #9 sure to trauma.
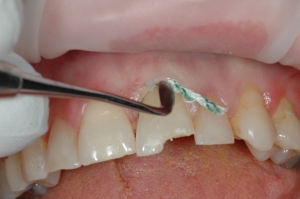
FIGURE 2: A retraction cord (GingiBRAID+ #2, Dux Dental, Oxnard, CA) was placed to isolate tooth #9 prior to treatment.
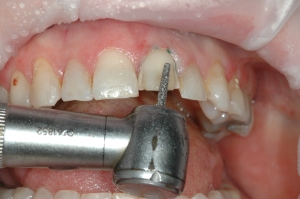
FIGURE 3: Tooth #9 was prepared for the veneer restoration.
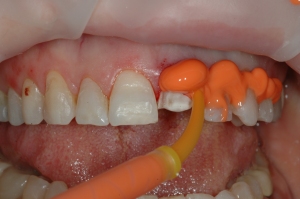
FIGURE 4: The Virtual®XD light body fast set wash material was syringed around the preparation, with the tip buried into the material to avoid air, bubbles, or kids in the impression.

FIGURE 5: The Virtual®XD heavy body fast set tray material was dispensed into the tray and seated in the patient’s mouth for 2 ½ minutes.
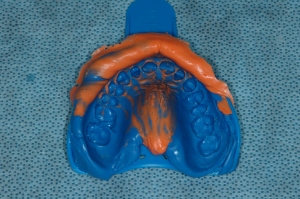
FIGURE 6: After the impression was checked, it was removed from the mouth, rinsed, dried, and disinfected.

FIGURE 7: A light curing, fluoride releasing, single-component, and total-etch adhesive (ExciTE F, Ivoclar Vivadent, Amherst, NY) was placed on the preparation and light cured.
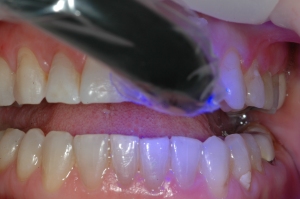
FIGURE 8: The restoration was seated into place using an esthetic luting composite (Varliolink Veneer, Ivoclar Vivadent) and cured using an LED curing light (Bluephase, Ivocalr Vivadent); no contact adjustment was necessary due to the accuracy of impression.

FIGURE 9: The final postoperative view of the veneer restoration on tooth #9.